For optimal reading, please switch to desktop mode.
How to create a veth pair to connect two Linux bridges using NetworkManager
Background
The veth devices are virtual Ethernet devices. They are always created in interconnected pairs and can act as tunnels between network namespaces and used as standalone network devices (see veth(4)). Tenks uses veth pairs to create links between bridges and virtual machines, and sets these veth pairs up using ip commands. However, networking set up with ip commands is not persistent, and so rebooting a hypervisor destroys the network infrastructure, making any Tenks VMs unreachable. By using a different tool to set up the network such as NetworkManager or systemd-networkd, the network is persistent across reboots, since network configuration is managed. In this blog post we will look at an example of how to set up a veth pair between two Linux bridges using NetworkManager.
Architecture
The architecture we are aiming for can be seen in the following diagram:
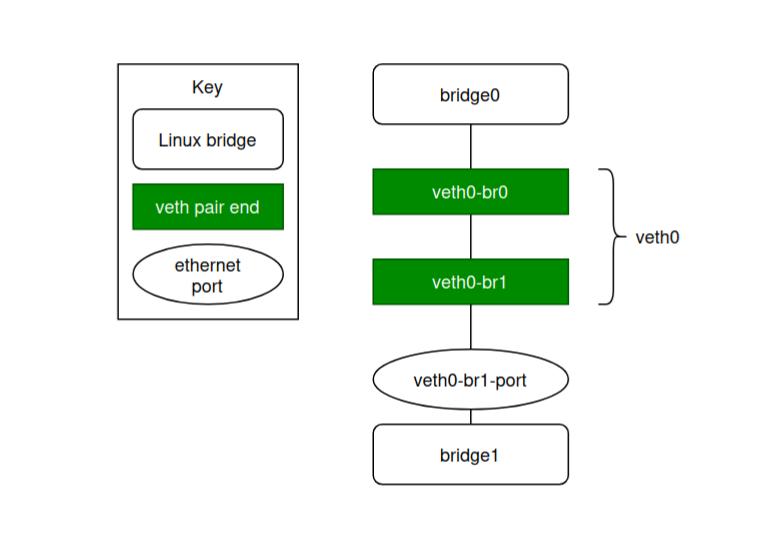
We will set up two Linux bridges and connect them to one another using a veth pair. A veth pair consists of two end points - a source and a peer. In this example, the veth pair connection is called veth0-br0, the source end is called veth0-br0 and the peer end is called veth0-br1. Notice how the names correspond to the respective bridges they will be plugged into. This naming convention helps to keep track of what needs to be plugged in where.
Commands
Let’s start with the bridges. Since the veth pair only forwards packets between bridges, DHCP can be disabled.
sudo nmcli connection add type bridge con-name bridge0 ifname bridge0 ipv4.method disabled ipv6.method disabled
sudo nmcli connection add type bridge con-name bridge1 ifname bridge1 ipv4.method disabled ipv6.method disabled
We can use nmcli connection show to check that our bridges have been set up:
[blog@stackhpc ~]$ nmcli connection show
NAME           UUID                                  TYPE      DEVICE
bridge0        856cd118-2da2-4ddd-bb45-961073859393  bridge    bridge0
bridge1        bd32aa8c-6aa5-4482-b20e-4a2572f51e37  bridge    bridge1
Now let’s create our veth pair.
sudo nmcli connection add type veth con-name veth0-br0 ifname veth0-br0 peer veth0-br1 ipv4.method disabled ipv6.method disabled
sudo nmcli connection add type veth con-name veth0-br1 ifname veth0-br1 peer veth0-br0 ipv4.method disabled ipv6.method disabled
Check that it has been created:
[blog@stackhpc ~]$ nmcli connection show
NAME           UUID                                  TYPE      DEVICE
bridge0        856cd118-2da2-4ddd-bb45-961073859393  bridge    bridge0
bridge1        bd32aa8c-6aa5-4482-b20e-4a2572f51e37  bridge    bridge1
veth0-br0      53c6acd4-f21c-4470-bb1f-2a2478ed28b8  veth      veth0-br0
veth0-br1      33a31f92-9df4-4c39-9bcf-6f716e3e40dd  veth      --
[blog@stackhpc ~]$ nmcli
bridge0: connected to bridge0
      "bridge0"
      bridge, 7E:CB:FC:AA:12:CD, sw, mtu 1500

bridge1: connected to bridge1
      "bridge1"
      bridge, 9A:C4:27:C5:89:D5, sw, mtu 1500

veth0-br0: connected to veth0-br0
      "veth0-br0"
      ethernet (veth), BE:F4:02:1B:41:73, sw, mtu 1500

veth0-br1: connected to veth0-br1
      "veth0-br1"
      ethernet (veth), 96:04:1E:A5:A0:E6, sw, mtu 1500
We need to plug each end of the pair into their respective bridges. For veth0-br0, we will add bridge0 as the master, and for veth0-br1 we will add bridge1 as the master.
sudo nmcli connection modify veth0-br0 master bridge0 slave-type bridge
sudo nmcli connection modify veth0-br1 master bridge1 slave-type bridge
All that’s left to do is bring all of our connections up and check the output:
sudo nmcli connection up bridge0
sudo nmcli connection up bridge1
sudo nmcli connection up veth0-br0
sudo nmcli connection up veth0-br1
You may have to wait a little while before the bridges come up - the spanning tree protocol checks them first to ensure we don’t create a network loop.
[blog@stackhpc ~]$ nmcli connection show
NAME            UUID                                  TYPE      DEVICE
bridge0         856cd118-2da2-4ddd-bb45-961073859393  bridge    bridge0
bridge1         bd32aa8c-6aa5-4482-b20e-4a2572f51e37  bridge    bridge1
veth0-br0       53c6acd4-f21c-4470-bb1f-2a2478ed28b8  veth      veth0-br0
veth0-br1       33a31f92-9df4-4c39-9bcf-6f716e3e40dd  veth      veth0-br1
[blog@stackhpc ~]$ nmcli
bridge0: connected to bridge0
      "bridge0"
      bridge, 7E:CB:FC:AA:12:CD, sw, mtu 1500

bridge1: connected to bridge1
      "bridge1"
      bridge, 9A:C4:27:C5:89:D5, sw, mtu 1500

veth0-br0: connected to veth0-br0
      "veth0-br0"
      ethernet (veth), BE:F4:02:1B:41:73, sw, mtu 1500
      controller bridge0

veth0-br1: connected to veth0-br1
      "veth0-br1"
      ethernet (veth), 96:04:1E:A5:A0:E6, sw, mtu 1500
      controller bridge1
[blog@stackhpc ~]$ ip a
8: bridge0: <BROADCAST,MULTICAST,UP,LOWER_UP> mtu 1500 qdisc noqueue state UP group default qlen 1000
   link/ether 7e:cb:fc:aa:12:cd brd ff:ff:ff:ff:ff:ff
9: bridge1: <BROADCAST,MULTICAST,UP,LOWER_UP> mtu 1500 qdisc noqueue state UP group default qlen 1000
   link/ether 9a:c4:27:c5:89:d5 brd ff:ff:ff:ff:ff:ff
10: veth0-br1@veth0-br0: <BROADCAST,MULTICAST,UP,LOWER_UP> mtu 1500 qdisc noqueue master bridge1 state UP group default qlen 1000
   link/ether 96:04:1e:a5:a0:e6 brd ff:ff:ff:ff:ff:ff
11: veth0-br0@veth0-br1: <BROADCAST,MULTICAST,UP,LOWER_UP> mtu 1500 qdisc noqueue master bridge0 state UP group default qlen 1000
   link/ether be:f4:02:1b:41:73 brd ff:ff:ff:ff:ff:ff
Deleting the connections
To remove the connections we set up in this session, we can use the nmcli connection delete command. This will remove the device and associated configuration files.
sudo nmcli connection delete veth0-br1
sudo nmcli connection delete veth0-br0
sudo nmcli connection delete bridge0
sudo nmcli connection delete bridge1
[blog@stackhpc ~]$ nmcli connection show
NAME           UUID                                  TYPE      DEVICE